Paylaş
- Pardus BTRFS kurulum – Bölüm 1
- Pardus BTRFS kurulum – Bölüm 2
Grub Kurulumu
Giriş
Bu yazıda btrfs dosya sistemi ile kurulum yapılan Pardus işletim sistemi kurulu bilgisayarlarda grub önyükleyici kurulumunun nasıl yapılacağı anlatılacaktır. Yazının 1. bölümü olarak bahsedilen Pardus btrfs kurulumu yazısına buradan ulaşabilirsiniz. Ayrıca btrfs sistemde timeshift kullanımına örnek verilecektir.
Bilgi
Grand Unified Bootloader (Büyük Birleşik Önyükleyici) ya da GNU GRUB (kısaca GRUB), bilgisayar açılışında işletim sistemlerini yüklemeye yarayan özgür bir önyükleme yazılımıdır. GNU Tasarısı‘nın bir parçasıdır. GRUB, işletim sisteminin yüklenerek açılmasını sağlar. Birden fazla sayıda işletim sisteminin yüklü olduğu bilgisayarlarda (örneğin Windows ve Pardus gibi) bilgisayar açılışında bir menü ekrana getirerek kullanıcının bu işletim sistemleri arasında geçiş yapabilmesini sağlar.
Kurulum Aşamaları
Pardus Çalışan ile canlı masaüstüne giriş yapalım. Ardından uçbirim açıp şu kodlarla devam edelim.
sudo su -
apt update
apt install btrfs-progs os-prober
Önyükleme bölümünün ve sistemin kurulu olduğu disk bölümünün üzerilerinde işlem yapabilmek için uygun bir bağlama noktası altında alt dizin oluşturalım ve aşağıdaki komutlarla btrfs sistemin root dizini olan @ bölümünü bu alt dizine bağlayalım.
mkdir /mnt/pardus
mount -t btrfs -o subvol=@ /dev/vda3 /mnt/pardus
Hatırlatma
Sistemde diskimiz vda olarak listeleniyor. Sizde sda ya da nvme0n1 olarak listelenebilir. Komutu buna göre düzenleyin.
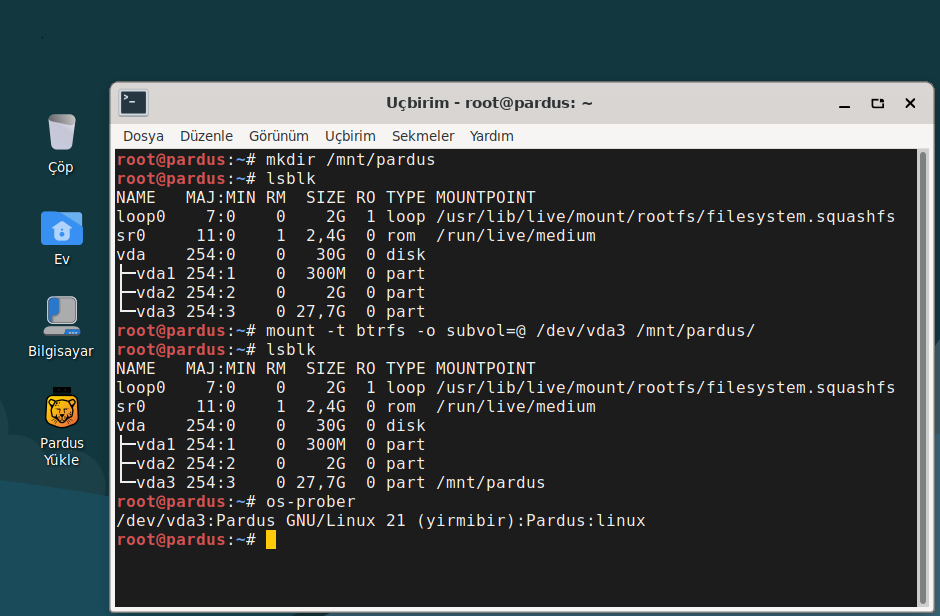
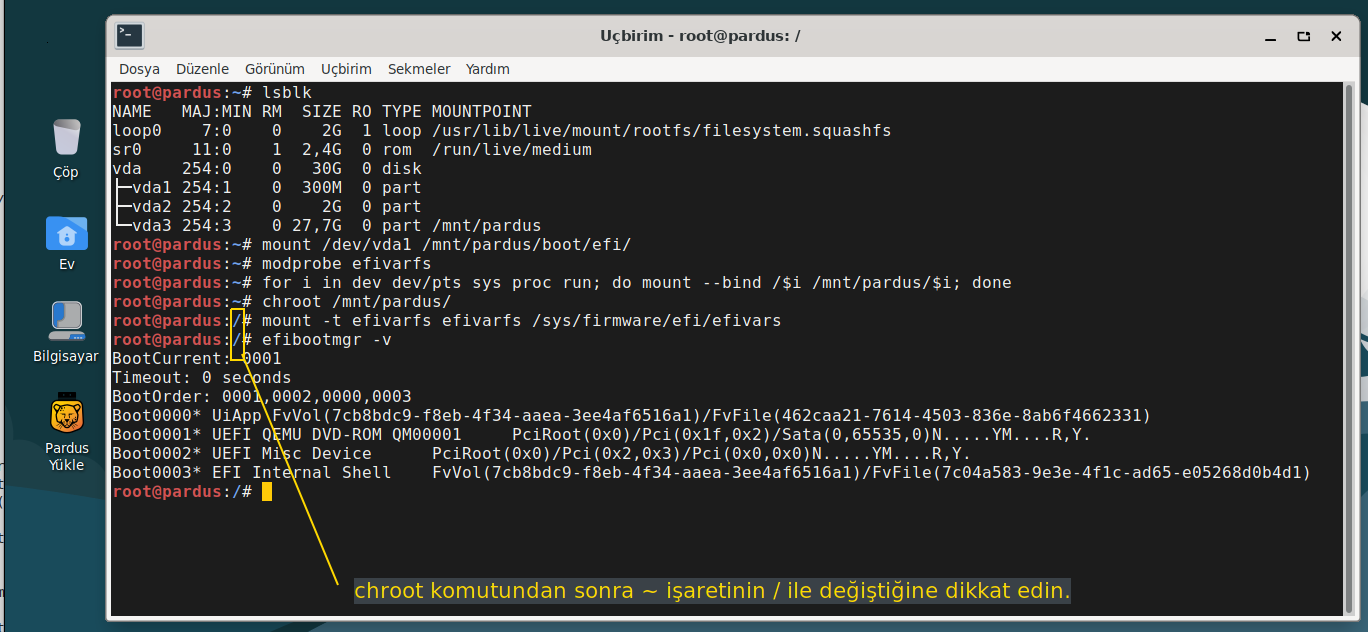
Şimdi efi bölümünü bağlayıp chroot geçiş için gerekli kodları düzenleyelim. chroot ile btrfs sisteme giriş yapıp efi bölümü kontrol ettirelim.
mount /dev/vda1 /mnt/pardus/boot/efi
modprobe efivarfs
for i in dev dev/pts sys proc run; do mount --bind /$i /mnt/pardus/$i; done
chroot /mnt/pardus/
mount -t efivarfs efivarfs /sys/firmware/efi/efivars
efibootmgr -v
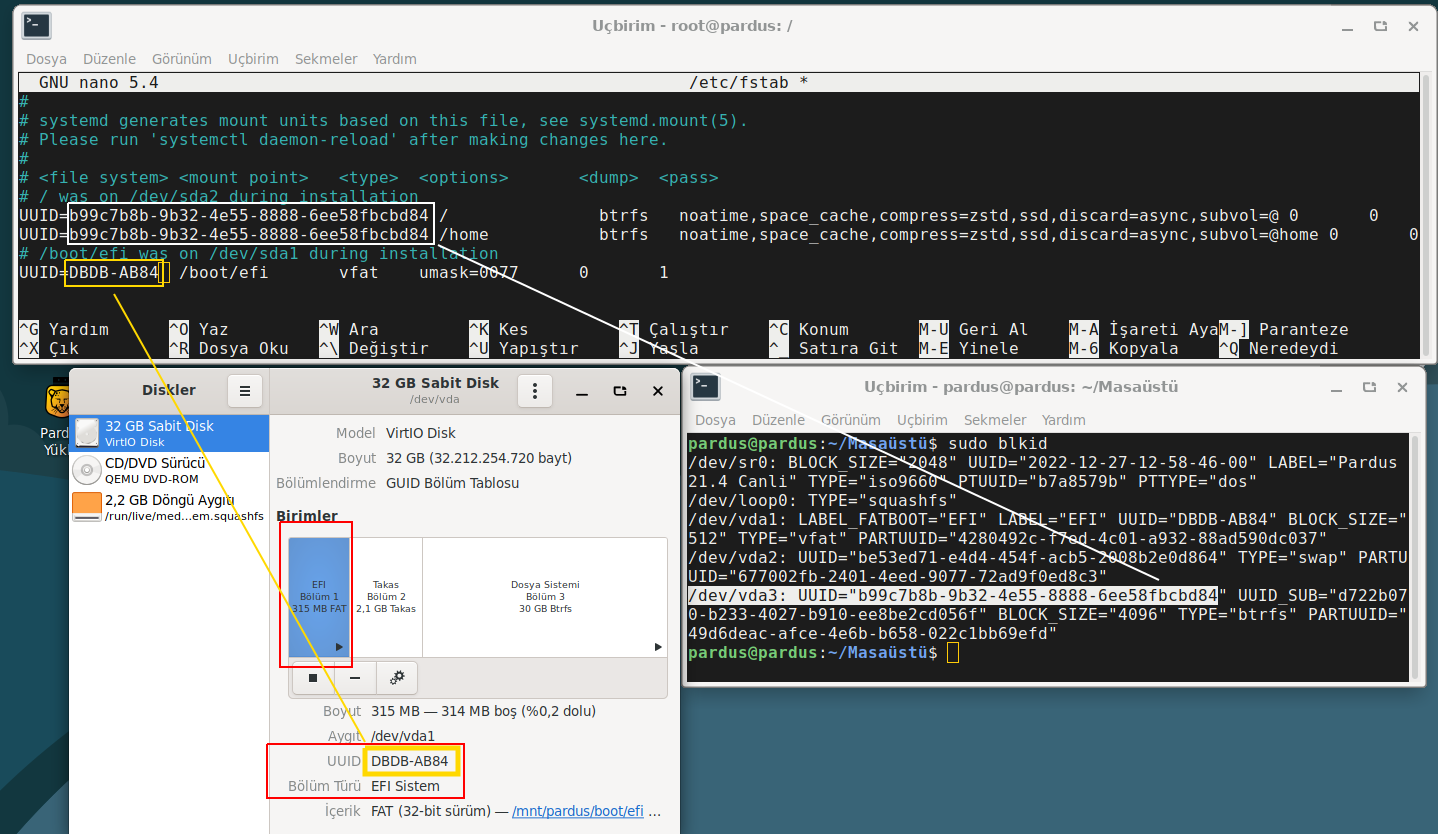
Şimdi sıra fstab dosyasını düzenlemeye geldi.
Bilgi
fstab Unix ve Unix benzeri bilgisayar sistemlerinde /etc dizininde yaygın olarak bulunan bir sistem dosyasıdır. Linux’ta, util-linux paketinin bir parçasıdır. fstab dosyası tipik olarak tüm kullanılabilir disk bölümlerini ve diğer dosya sistemi türlerini ve disk tabanlı olması gerekmeyen veri kaynaklarını listeler ve bunların nasıl başlatılacağını veya daha büyük dosya sistemi yapısına nasıl entegre edileceğini gösterir. fstab dosyası, genel dosya sistemi yapısını belirlemek için önyükleme sırasında otomatik olarak gerçekleşen mount komutu tarafından okunur.
nano /etc/fstab
/etc/fstab
btrfs sisteme göre düzenlenmiş fstab örneği
# /etc/fstab: static file system information.
#
# Use 'blkid' to print the universally unique identifier for a
# device; this may be used with UUID= as a more robust way to name devices
# that works even if disks are added and removed. See fstab(5).
#
# systemd generates mount units based on this file, see systemd.mount(5).
# Please run 'systemctl daemon-reload' after making changes here.
#
# <file system> <mount point>   <type>  <options>       <dump>  <pass>
# / was on /dev/sda2 during installation
UUID=2ed97873-259d-4973-8b70-0601cf6693f1 /               btrfs   noatime,space_cache,compress=zstd,ssd,discard=async,subvol=@ 0       0
UUID=2ed97873-259d-4973-8b70-0601cf6693f1 /home           btrfs   noatime,space_cache,compress=zstd,ssd,discard=async,subvol=@home 0       0
# /boot/efi was on /dev/sda1 during installation
UUID=4EC5-446B  /boot/efi       vfat    umask=0077      0       1
Dikkat
Bu aşamada kendi disk bölüm uuidlerini ilgili satırlarda düzeltmeniz çok önemli. Aksi takdirde siyah ekranlarda dönüp durursunuz.
UUID
Disk bölüm uuidsini hem Diskler (gnome-disks) uygulaması ile hem de komut satırından öğrenebiliriz. Örnek resimdeki gibi.
fstab dosyasında gerekli düzenlemeyi bitirdikten sonra Ctrl +X klavye tuş kombinasyonu ardından E tuşuna basarak dosyayı kaydedip çıkıyoruz.
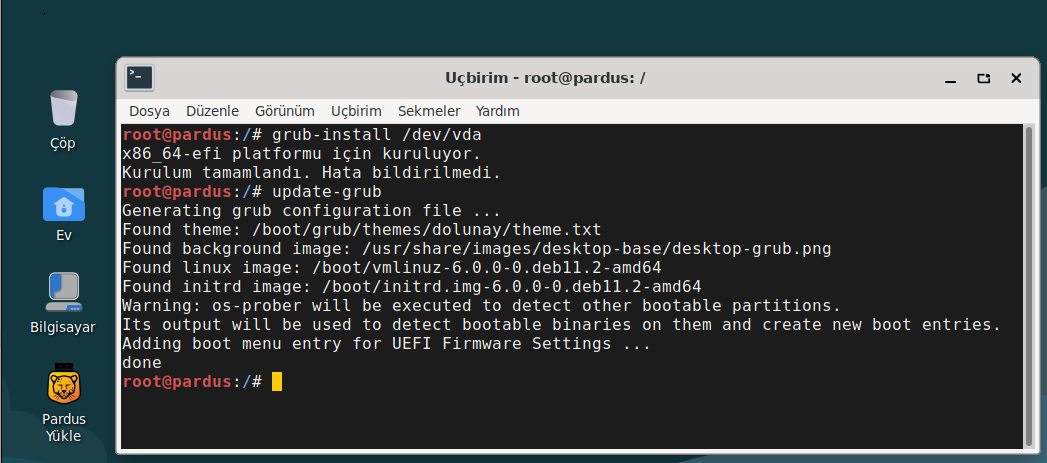
Şimdi grub kurma ve ardından grub güncelleme komutlarını yazıyoruz.
grub-install /dev/vda
update-grub
Grub kurma işlemi tamamlandığına göre bağladığımız bölümleri ayıralım. İlk olarak chroottan çıkalım sırasıyla efi ve diğer sistem bölümlerinin bağlantılarını kaldıralım.
exit
umount /mnt/pardus/boot/efi
for i in run proc sys dev/pts dev; do umount -lf /mnt/pardus/$i; done
umount /mnt/pardus
exit
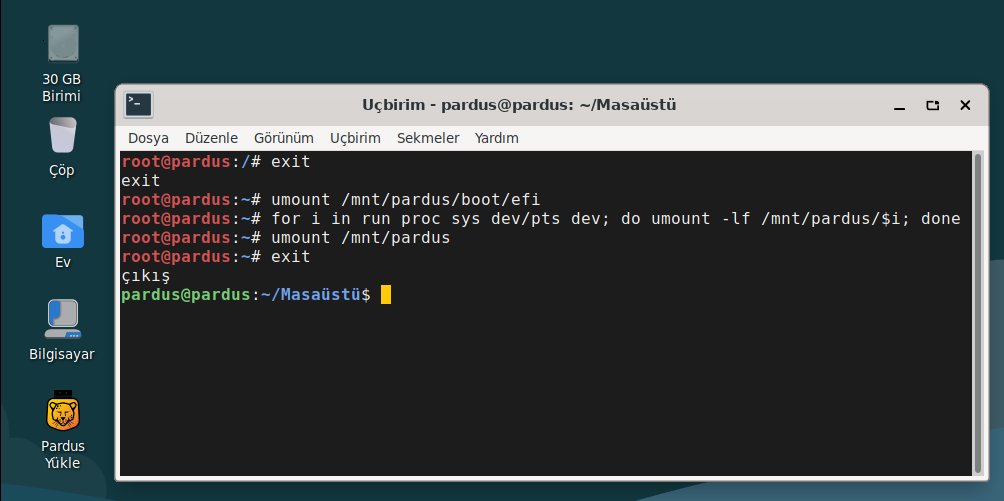
Artık sistemi yeniden başlatabilirsiniz. Pardus açılış ekranı sizi karşılayacak.
Btrfs Timeshift ile kullanım
Kullanıcı girişi yaptınız ve artık sistemi kullanmaya başlayacaksınız. Ama bir dakika niye btrfs sistem kurmak için bunca zahmete katlandığımızı hatırlatacağım size : )
Hemen uçbirim açıp kodları yazmaya başlayalım.
Hatırlatma
Hem btrfs-progs hem de timeshift yüklü gelmiyor. İlk iş olarak bu paketleri yükleyeceğiz.
sudo apt update
sudo apt install btrfs-progs timeshift
Şimdi disk bölümlerini ardından btrfs alt bölümleri listeleyelim ve duruma bir göz atalım.
lsblk
sudo btrfs subvolume list .

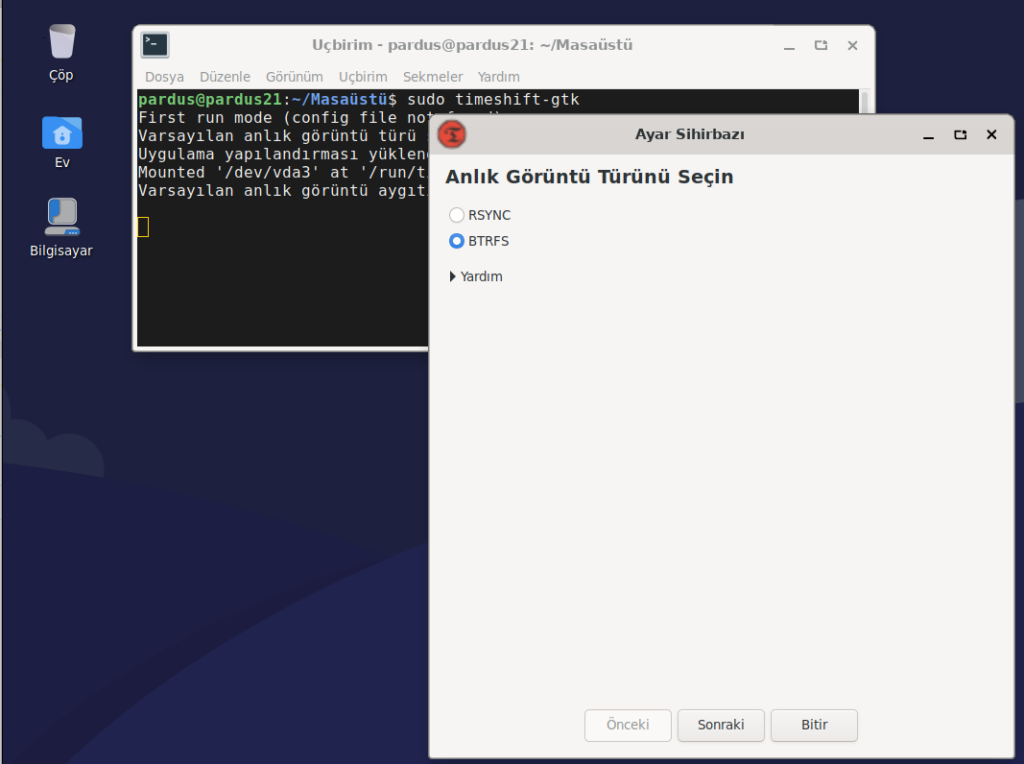
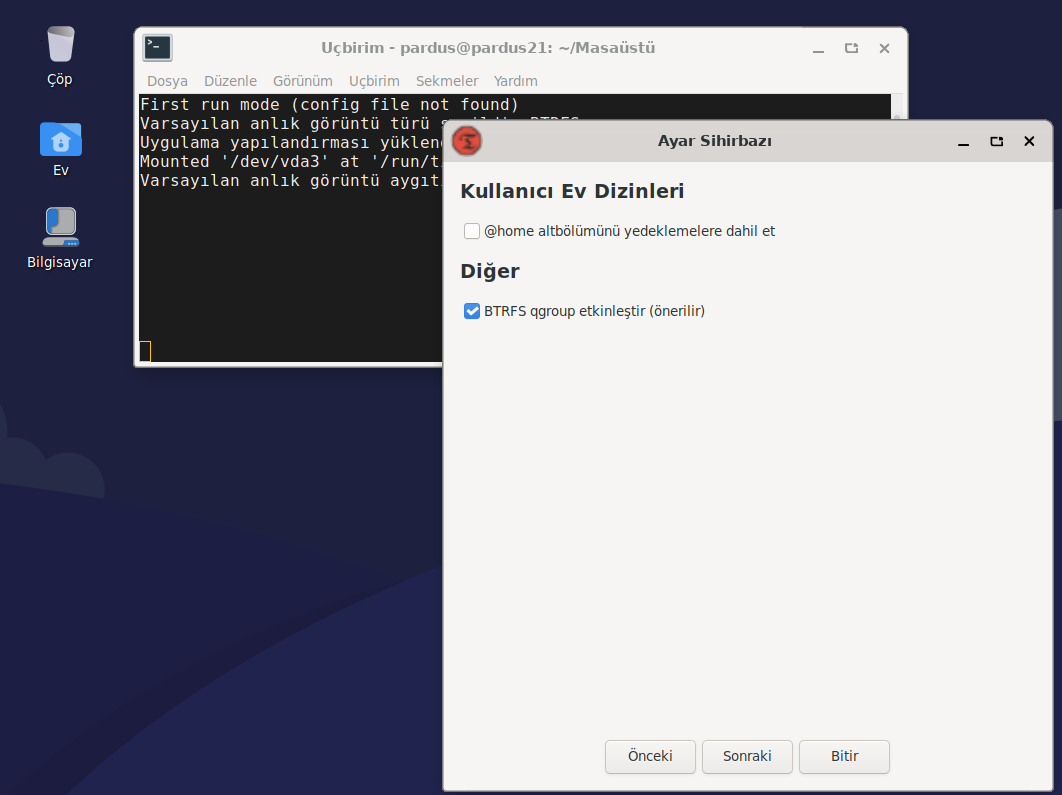
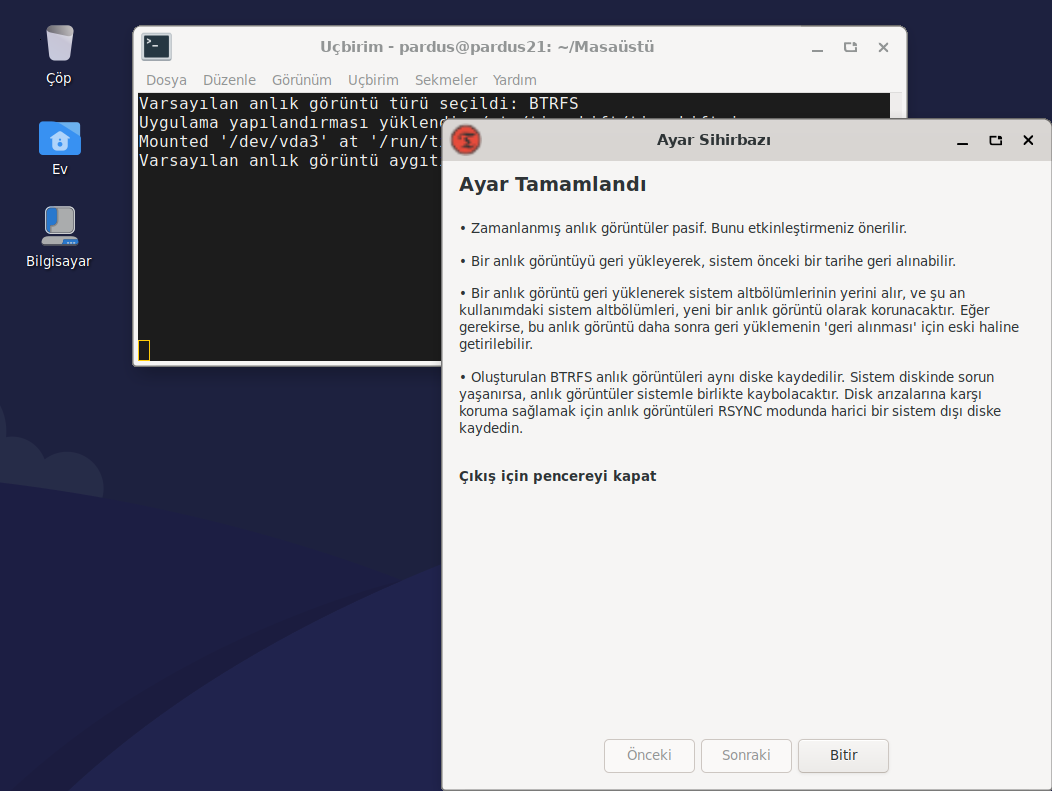
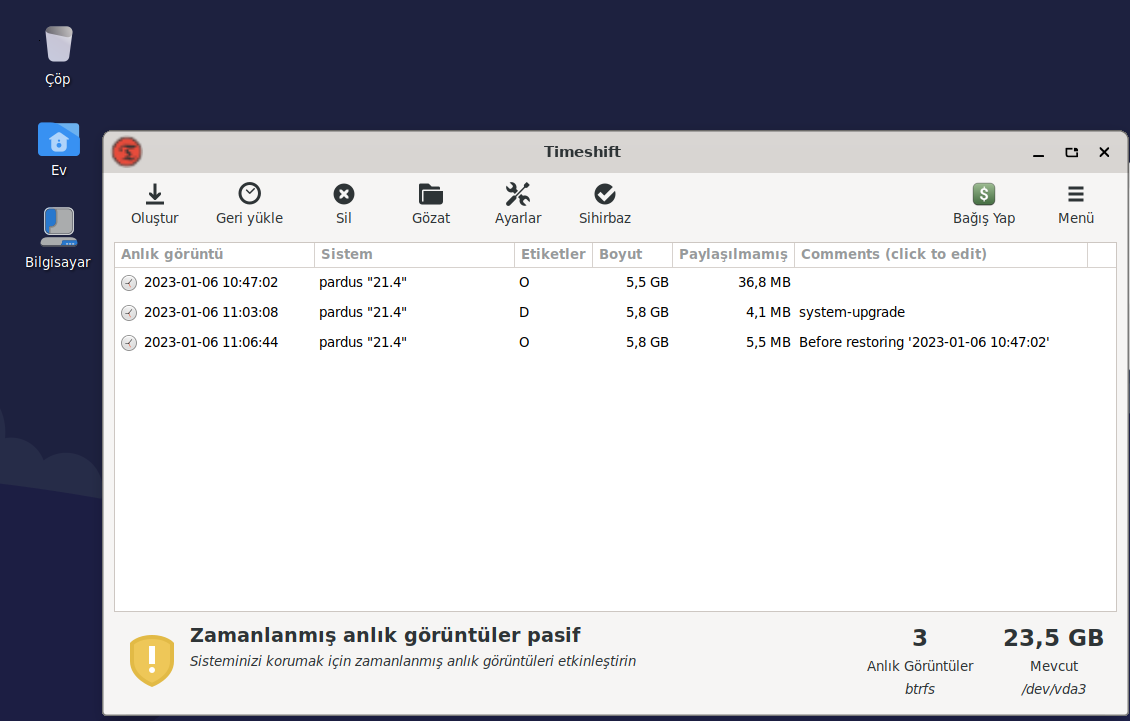
Timeshift uygulamasını ister Uygulamalar menüsünden ister komut satırından çalıştıralım. Uygulama ilk çalıştırıldığında Ayar Sihirbazı bizi karşılıyor ve yönlendiriyor. BTRFS sistemi algıladı ve ona göre seçimi otomatik olarak gerçekleştirdi.
Timeshift
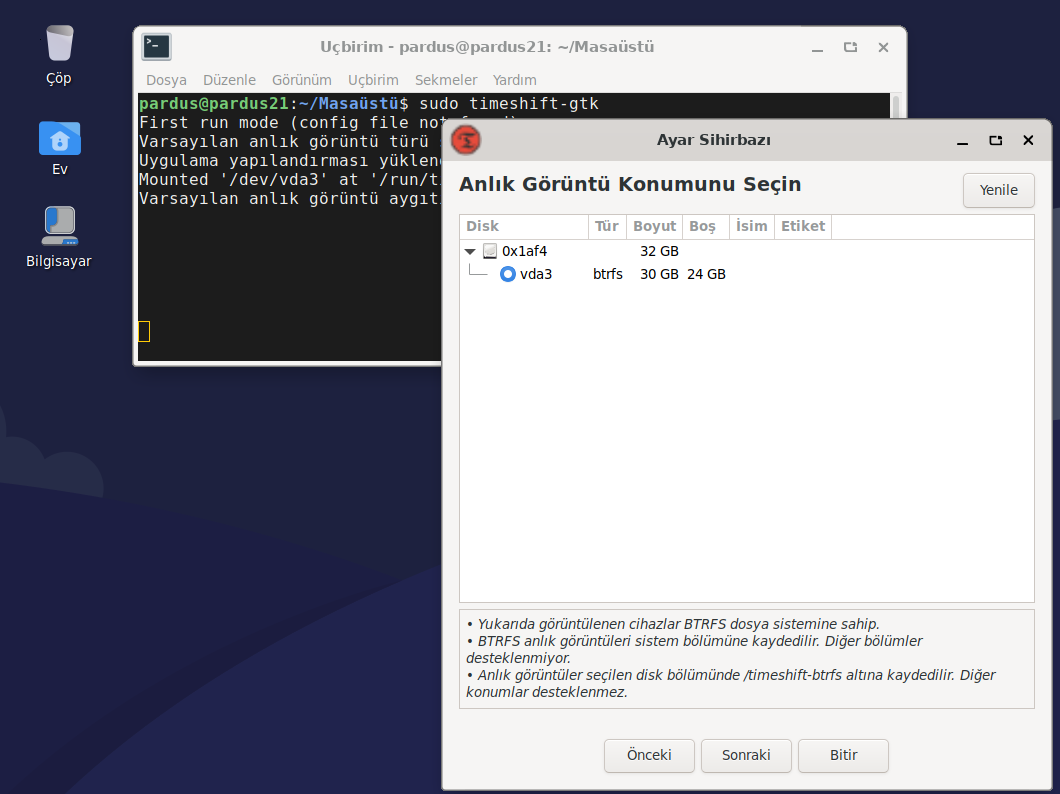
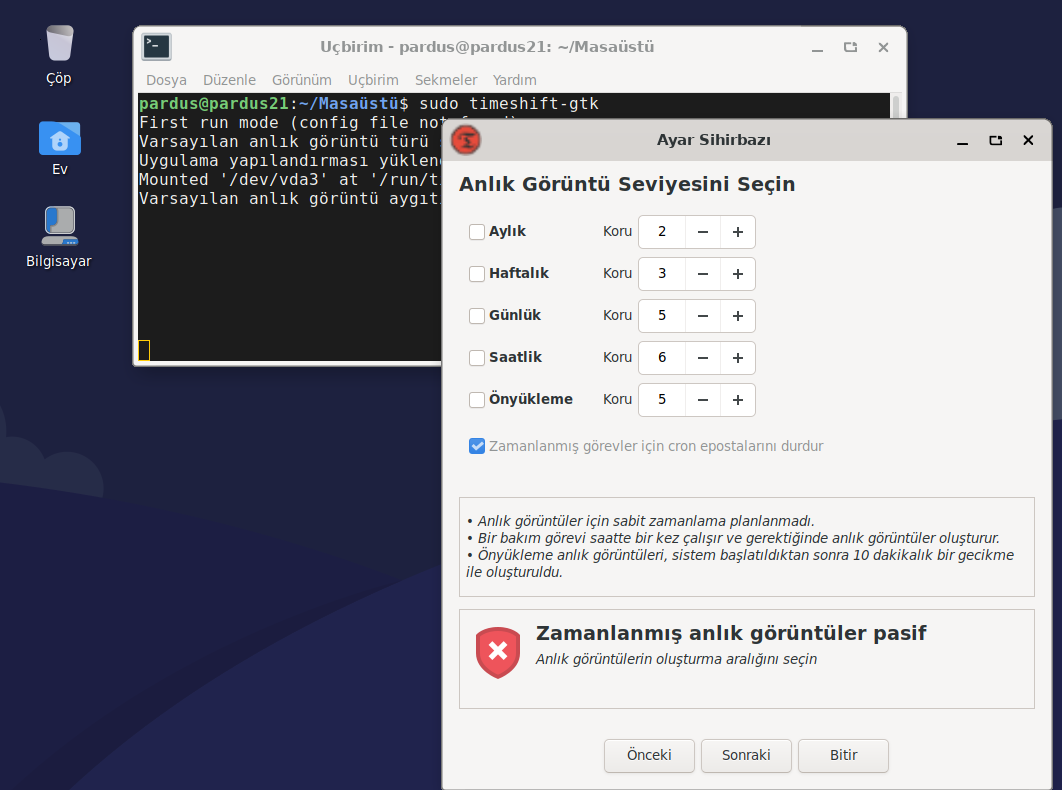
Ayar sihirbazı ile yedeklemelerin yapılacağı konumu, yedekleme planını, kullanıcı dizinlerinin yedeğe dahil edilip edilmeyeceğini belirleyebilirsiniz.
Timeshift
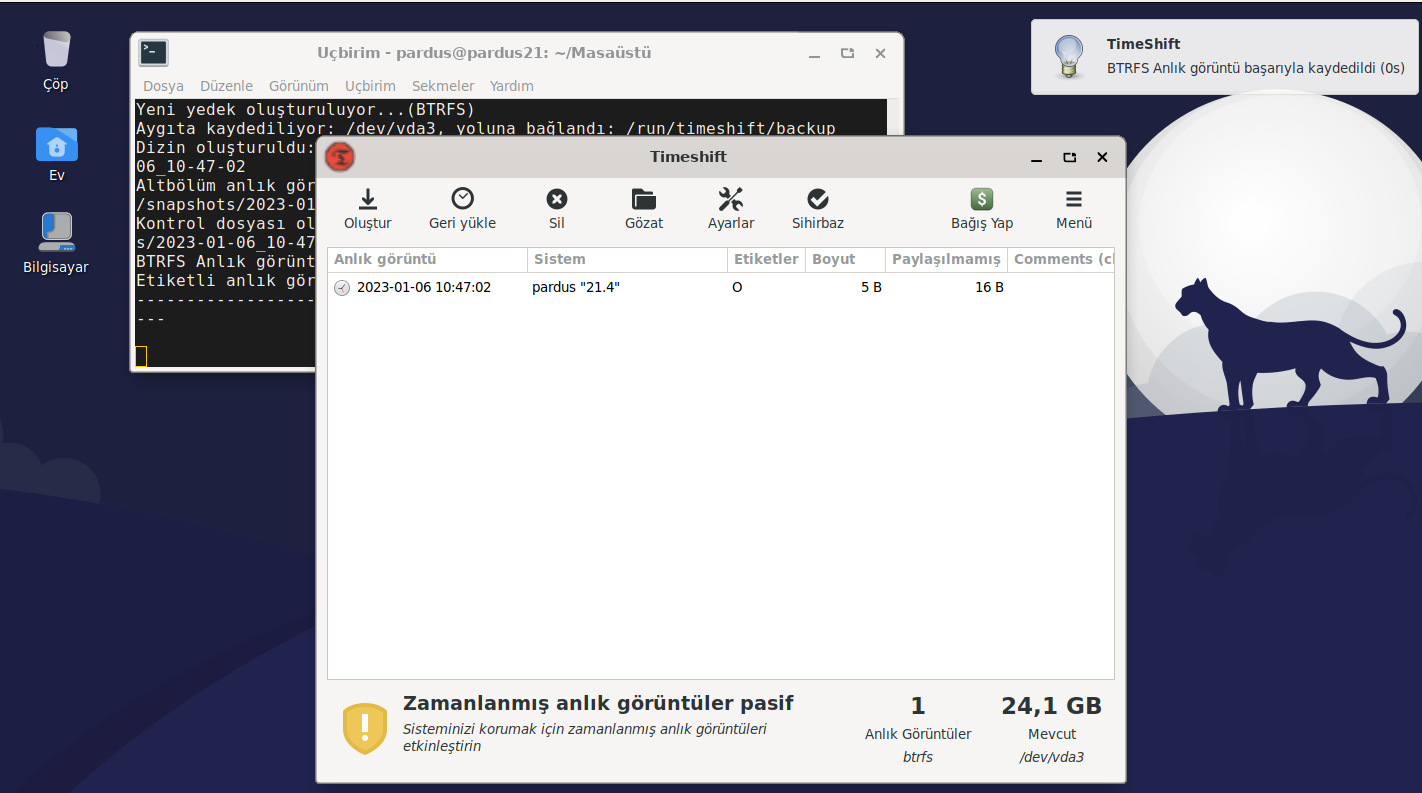
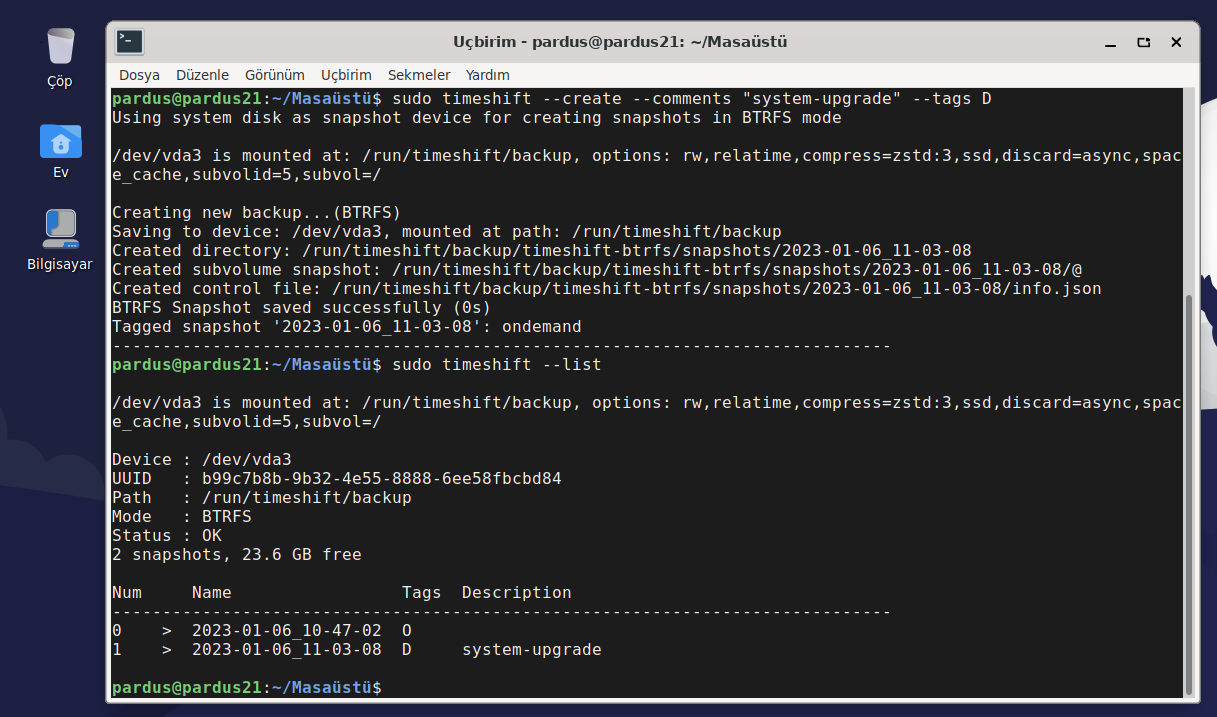
Oluştur butonu artık sistem yediğinizi alabilirsiniz ve bu işlem donanım hızına bağlı olarak çok kısa bir sürede tamamlanacaktır.
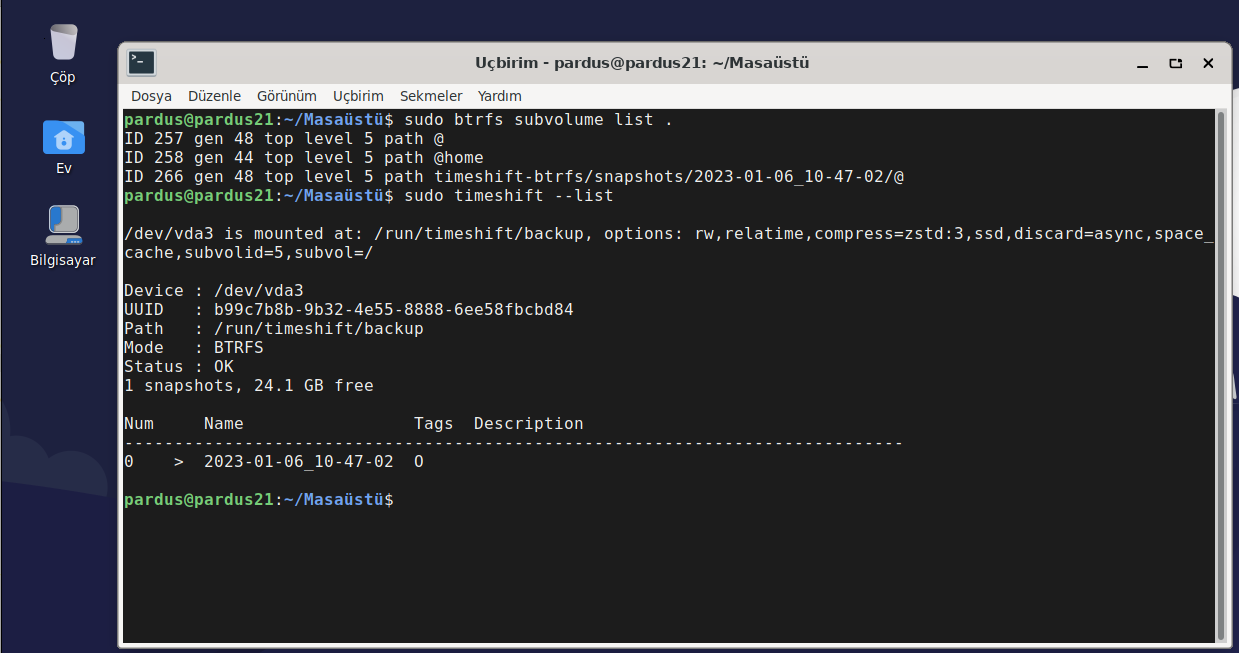
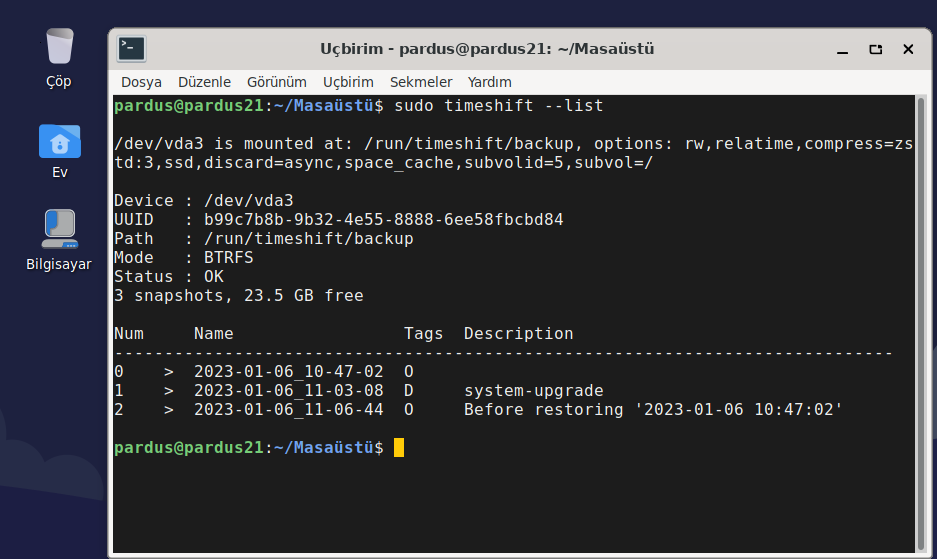
Şimdi tekrar btrfs alt bölümlerle birlikte timeshift yedeklerine uçbirimde göz atalım.
sudo btrfs subvolume list .
sudo timeshift --list
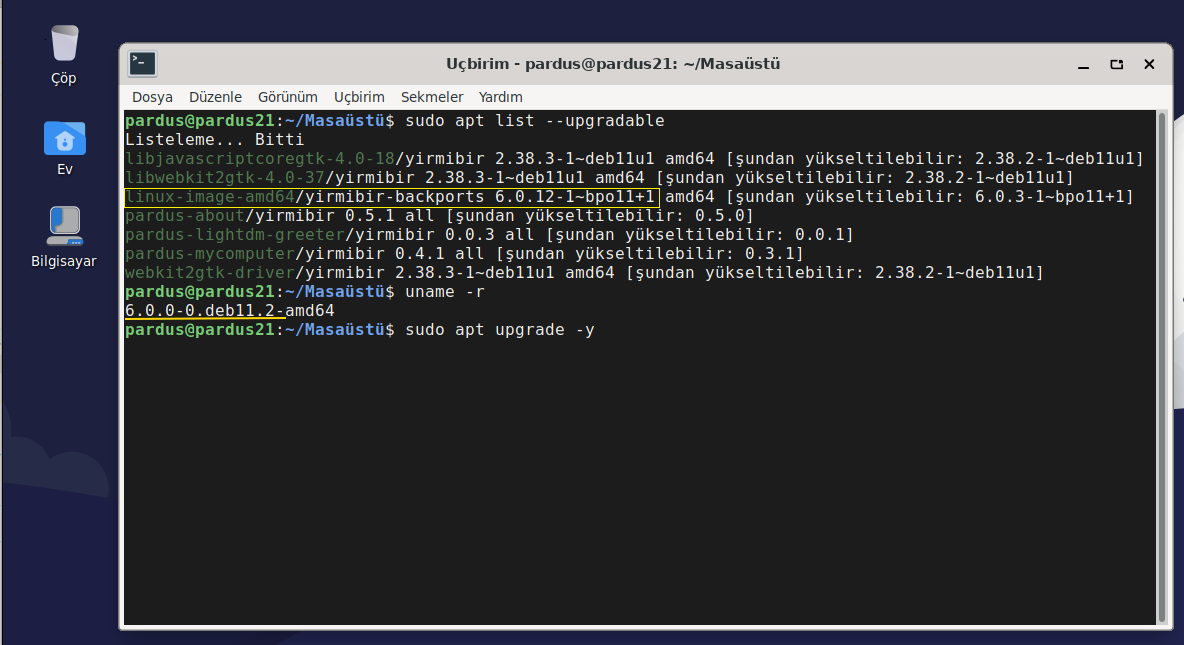
Bir de sistemi güncelleyip ardından güncelleme öncesine dönüş senaryosu uygulayalım. Güncellemeden önce timeshift ile bir yedek oluşturulmuştu.
Timeshift
Sisteme kernel güncellemesi dahil bazı paket güncellemelerin geldiği görülüyor.
Timeshift
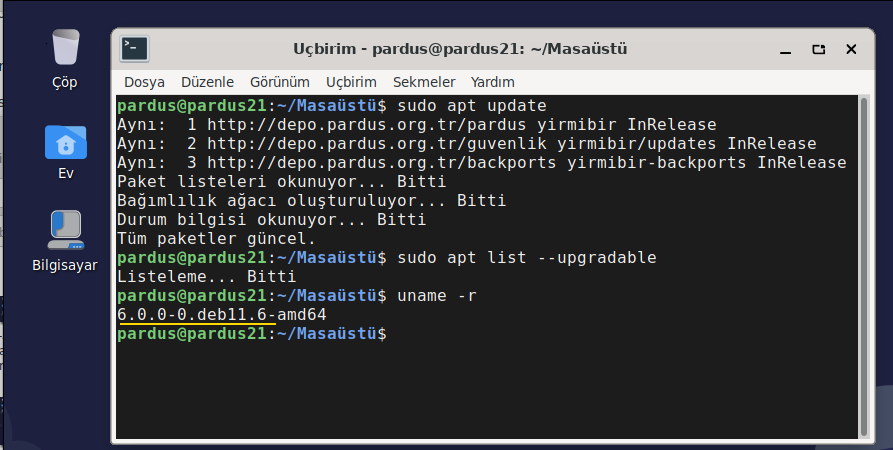
Güncelleme işlemini yaptık, bilgisayarı yeniden başlattık , kontrol ettiğimizde yeni kernel dahil güncellemelerin uygulandığı görülüyor.
Timeshift
Güncelleme uygulanmış sistemin tekrar yedeği oluşturuldu.
Timeshift
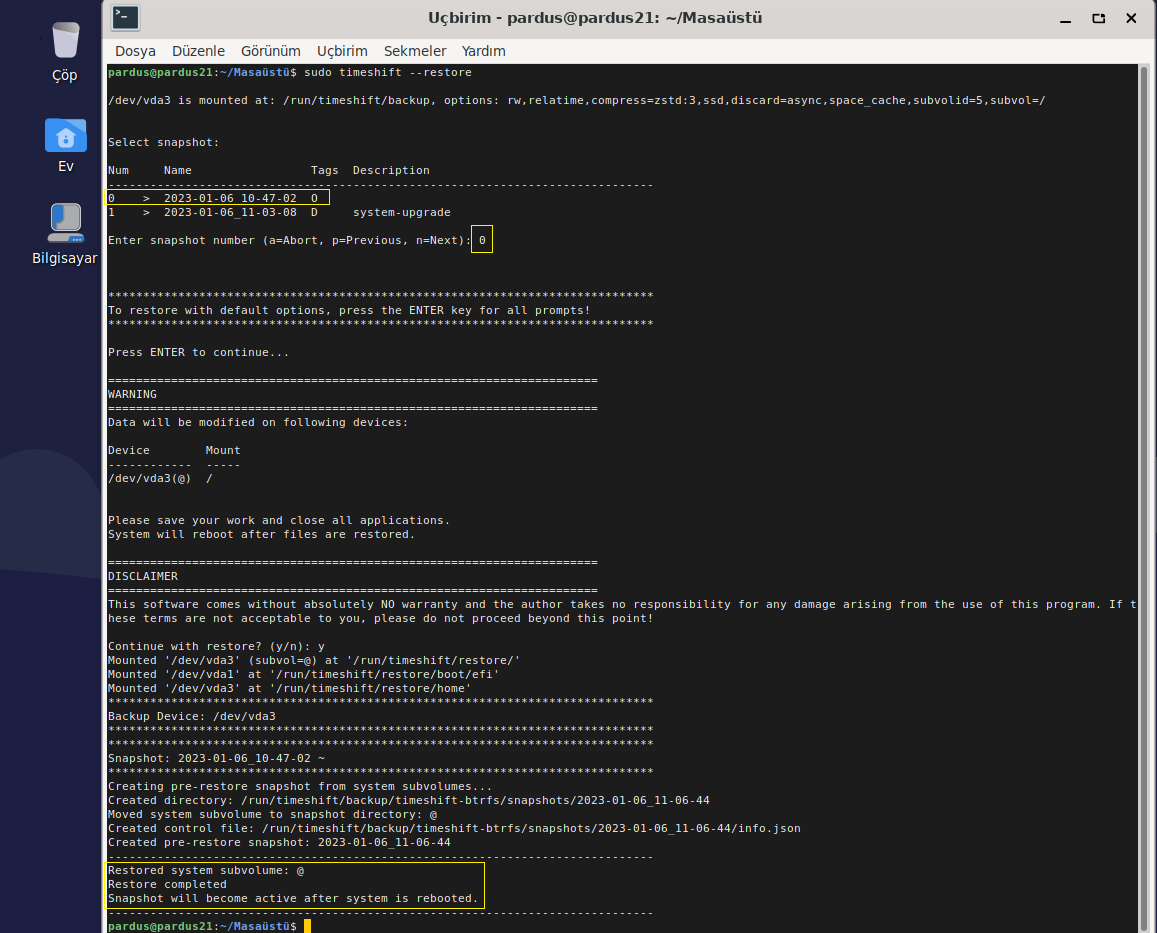
Ardından güncelleme öncesi yedeğe geri dönüldü.
Timeshift
Yeniden başlatmanın ardından güncelleme kontrolü yapıldığında güncelleme paketlerinin tekrar listelendiği görüldü. Aynı zamanda timeshift uygulanan işlemi geri alma ihtimali ile bir yedek daha oluşturdu. En güzeli bunca işlem saniyeler içerisinde tamamlandı : )
Faydalı olması dileğiyle , başka yazılarda görüşmek üzere…

Benzer Yazılar
İlginizi Çekebilir
ETAP’ta Pencereleri Yönetmenin En İyi Yolu: gTile ile Verimliliğinizi Artırın!
Nasıl?
19 Şub '25Pardus Güncel Nvidia Sürücü Kurulumu
Pardus'a Giriş
26 Ara '24Bir git tabanlı projede yazma iznine sahip olmak isteyen Hackerlar(Yazılımcılar) için Kılavuz
Nasıl?
15 Şub '24Az bilinen nano özellikleri
Nasıl?
9 Şub '24