Paylaş
Temel kavramların hemen ardından sanal makine kurulumunu Pardus’umuza yapacağız.
Günümüzde teknolojinin gelmiş olduğu son noktada masaüstü ve iş platformlarında sunulan birden çok sanallaştırma çözümü mevcut. Bunların en bilinenleri arasında VirtualBox, VMware başı çekmekte. Hepsinin farklı artı ve eksileri mevcut.
Eskiden Windows üzerinden sanallaştırma yazılımıyla Linux ya da farklı işletim sistemlerini deneyimliyorduk. Bugün gelinen noktada devran yavaş yavaş tersine dönmeye başladı. Linux üzerinden diğer işletim sistemlerini hatta diğer Linux dağıtımlarını sanal makinelere kurup test etmeye başladık.
O zaman da Linux kullanıcılarının aklına hangisi daha iyi ya da daha performanslı gibi sorular gelmeye başladı. Linux tarafında KVM (Kernel Virtual Machine) özelliği sayesinde çekirdek içine entegre şekilde bir sanallaştırma çözümü sunulabiliyor.
“Bu ne demek şimdi?” diyorsanız, ana Windows koduna entegre edilmiş ve bu entegrasyonu farklı uygulamalarında kullanabildiği gerçekten performanslı, az sorun çıkaran bir sanallaştırma yapısı olarak düşünün derim.
Elbette KVM bu yapıyı sunarken tek başına bu işi yapmıyor. Yapının daha sağlam ve kullanıcı dostu olarak çalışabilmesi içinde yardımcı enstrümanlara ihtiyaç duyuyor. Biri Libvirt diğer görsellik için çoğu kişinin tercih ettiği Virt-Manager (Virtual Machine). Biz yazımızı bu enstrümanlar üzerine kuracağız.
Özellikle Virt-Manager kullanımı ikinci bölümde anlatılacak. Zaten giriş kısmı bana göre yeterince uzun oldu bile. Haydi, şimdi kurulum aşamalarına geçelim.
Sanal makine kurulumuna giriş
Kuruluma başlamadan önce kullandığımız bilgisayarın sanallaştırmayı destekleyip desteklemediğini görmek için aşağıdaki komutları veriyoruz.
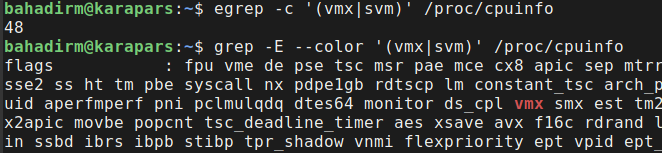
egrep -c '(vmx|svm)' /proc/cpuinfo
grep -E --color '(vmx|svm)' /proc/cpuinfo
İlk komut işlemci desteğini tespit etmek için çıktısının aşağıdaki fotoğraftaki gibi 0’dan büyük değerler olması lazım. Diğer komutta hangi komut kümesiyle sanallaştırmanın desteklendiği Intel için VMX, AMD için SVM yazılarından biri ekranda kırmızı renkte görünmeli.
Yukarıdaki gibi her şey yolundaysa o zaman bir sistem güncelleme durumunu aşağıdaki komutla kontrol ediyoruz. Eğer karşımıza güncellenecek paketler hakkında bilgi geliyorsa önce sistemimizi güncelliyoruz. Ardından da yolumuza devam ediyoruz.
sudo apt update
Şimdi sıra KVM ve çevresellerinin yüklenmesine geldi, aşağıdaki komut ile gerekli yüklemelerin yapılmasını sağlıyoruz.
sudo apt install qemu-kvm libvirt-clients libvirt-daemon-system bridge-utils virtinst libvirt-daemon
Şimdi de sırada Virt-Manager var. Aşağıdaki komutu verip onun da yüklenmesini sağlıyoruz.
sudo apt install virt-manager -y
Temelde kurulumlarımız bu şekilde bitiyor. Şimdi sırada ayarların kontrol edilmesi ve bir noktada farklı bir değer varsa güncellemesinin yapılması var.
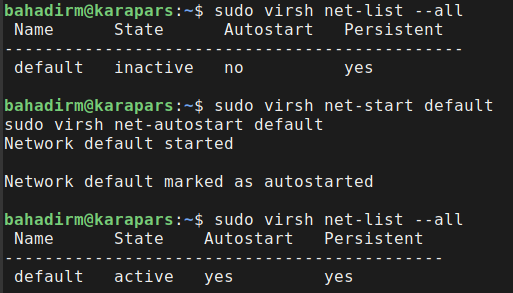
sudo virsh net-list --all
Yukarıdaki komut ile KVM için ayrılmış mevcut ağ bilgileri getirilir. Gelen bilgilerde aşağıdaki fotoğraftaki gibi “inactive” veya “no” değerleri varsa aşağıdaki komutlar ile ağ etkinleştirilir.
sudo virsh net-start default
sudo virsh net-autostart default
Sanallaştırılmış makinelerde daha düzgün bir ağ betiğinin oluşmasını sağlamak için aşağıdaki komutlar kullanılır.
sudo modprobe vhost_net
lsmod | grep vhost
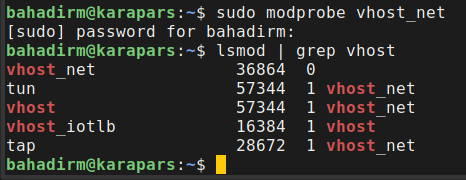
Bu sayede ilk aşamayı başarıyla tamamladık. Şimdi Pardus içinde başlat menüsüne virt diye yazmaya başladığınızda karşınıza gelen seçeneğe tıkladığınızda aşağıdaki gibi bir ekran sizleri karşılayacak.
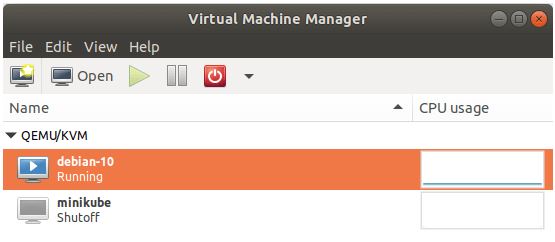
Virt-Manager yani Virtual Machine Manager‘ın kullanımı hakkında bilgileri de ikinci yazımda verip, seriyi tamamlayacağım.
Etiketler: