8 dk okuma süresi
15 Mar '23
Paylaş
Bu yazı da github.com/pardus adresindeki projelere veya başka dağıtımdaki projelere çeviri desteği sağlamak isterseniz yapmanız gerekenleri anlatacağız.
Bu yazımız aşağıdaki ana başlıklara ayrılmıştır.
- PO ve POT dosyaları nedir ve nasıl kullanılır ?
- GitHub’dan PO ve POT dosyalarına nasıl ulaşılır ?
- Çeviri için hangi araçlar kullanılır ?
- Çeviri dosyasını nasıl GitHub’a yüklenir ?
PO ve POT Dosyaları Nedir ve Nasıl Kullanılır ?
PO Dosyası Nedir ?
PO dosyaları içerisinde asıl metin ve çevrilmiş metinlerin olduğu çiftler halinde bir çok girdi vardır. Örnek olarak tr.po dosyasında bir girdi şöyle gözükebilir.
msgid "Hello world"
msgstr "Merhaba Dünya"
Her dilin kendine ait po dosyası vardır. Örneğin Türkçe dili için tr.po, Almanca dili için de.po, Fransızca dili için fr.po… şeklindedir.
POT Dosyası Nedir ?
POT dosyaları po dosyaları için bir şablondur. İçerisindeki girdiler de bütün çevrilecek metinleri içerir (msgstr kısımları boştur). Örnek olarak bir pot dosyası şu şekilde gözükür.
msgid "Hello world"
msgstr ""
Küçük Bir Not
PO ve POT dosyaları arasında bir kaç fark vardır.
PO dosyaları POT dosyasından oluşturulur. Örnek verecek olursak portekizce dilinde bir çeviri yapmak istiyorsanız ve portekizce çeviri dosyası, yani pt.po dosyası, yoksa, POT dosyasını kullanarak portekizce çeviri dosyasını pt.po’yu oluşturursunuz.
Detaylı bilgi için aşağıdaki adrese bakabilirsiniz.
Sözdizimi Kuralları ve Dikkat Edilmesi Gerekenler
PO ve POT dosyalarını kısaca anlattık. Şimdi bu dosyaların içeriğini ve kurallarını anlatacağız.
Bir po dosyası girdisinin şematik yapısı aşağıdaki gibidir.
white-space
#  tercüman yorumu
#. çıkartılmış yorum
#: referans…
#, flag…
#| msgid önceki çevrilmemiş metin
msgid çevrilmemiş metin
msgstr çevrilen metin
Yukarıdaki şemayı açıklayacak olursak;
- white-space: Bütün girdiler bir satır boşlukla başlar. Yerleştirilen bir satır boşluğu ifade eder.
- # –> Tercümanın girdi için yorum yazabileceği yeri ifade eder.
- #. –> Bu program tarafından, uygulamanın kaynak kodundan çıkarılan yorumları ifade eder.
- #: –> Programın kaynak koduna atılan referansı ifade eder.
- #, –> Kullanıcıya veya tercümana daha iyi tanı koyabilmesi için yerleştirilen flag’i ifade eder.
- #| –> Çevirmenin çeviri yaptığı önceki çevrilmemiş metni ifade eder.
- msgid –> Orjinal metini içeren satır.
- msgstr –> Orjinal metnin tercümesini içeren satır.
Çeviri yaparken gereken temel bilgiyi edindik. Şimdi çeviri dosyalarına GitHub üzerinden nasıl ulaşabiliriz ona bakalım.
GitHub’dan PO ve POT Dosyalarına Nasıl Ulaşılır ?
Bu kısımda GitHub üzerinden çeviri dosyalarına ulaşmak için aşağıdaki adımları takip edelim.
Öncelikle GitHub da bir hesabınız yoksa bir hesap oluşturun.
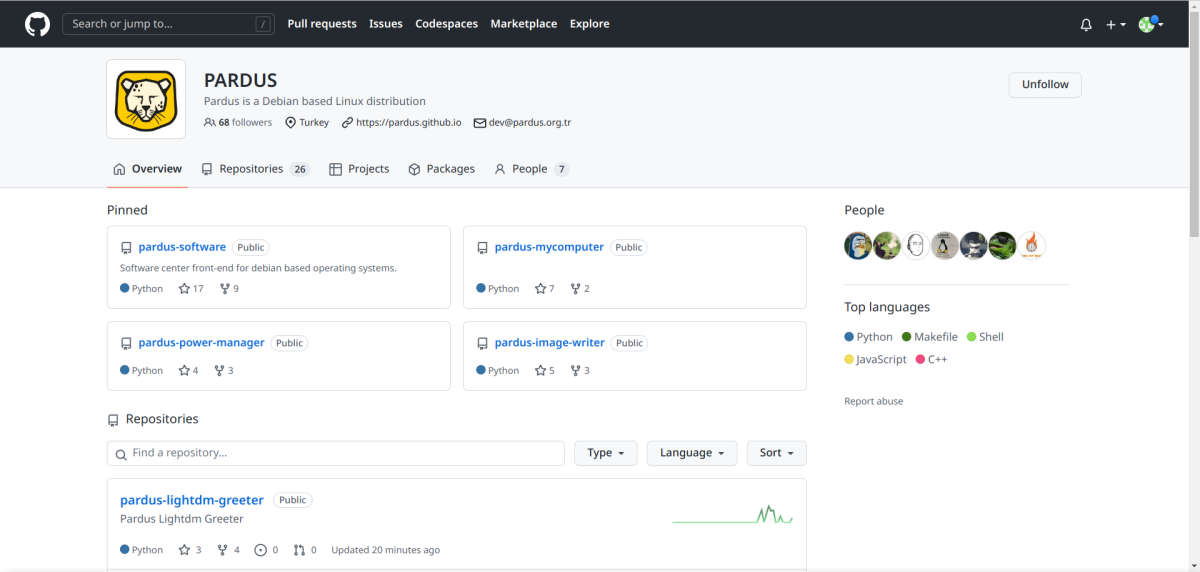
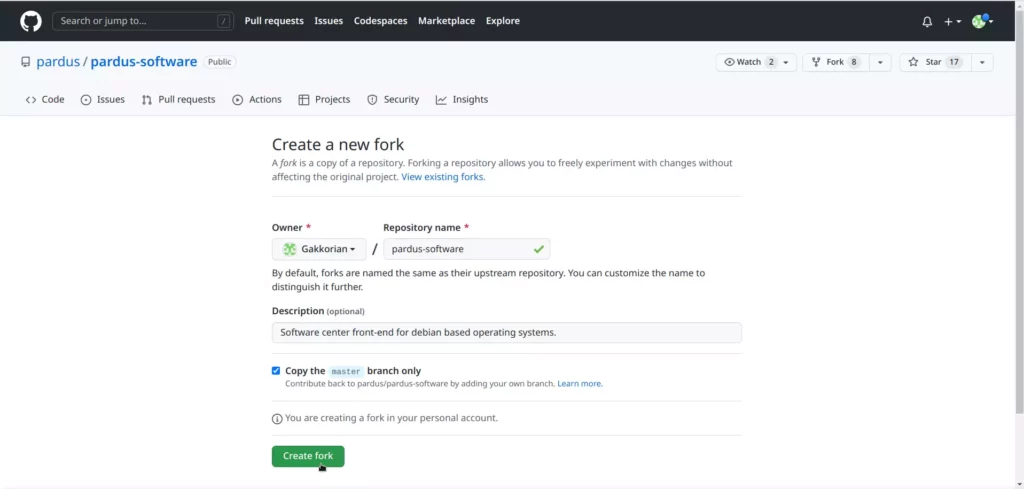
Ardından github.com/pardus adresine gidip çevirisini yapmak istediğiniz projeyi seçiniz.
Projeyi seçikten sonra projeyi forklayıp kendi hesabınıza bir kopyasını oluşturun.
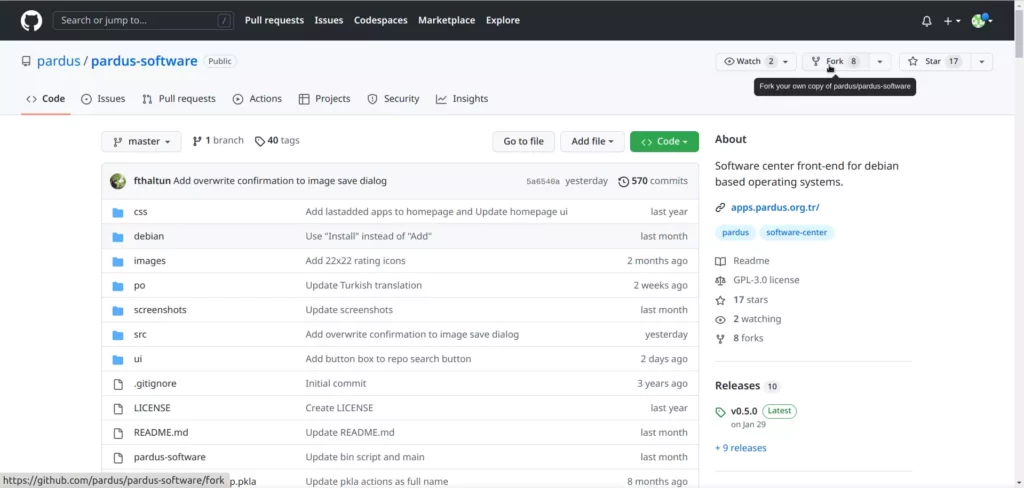
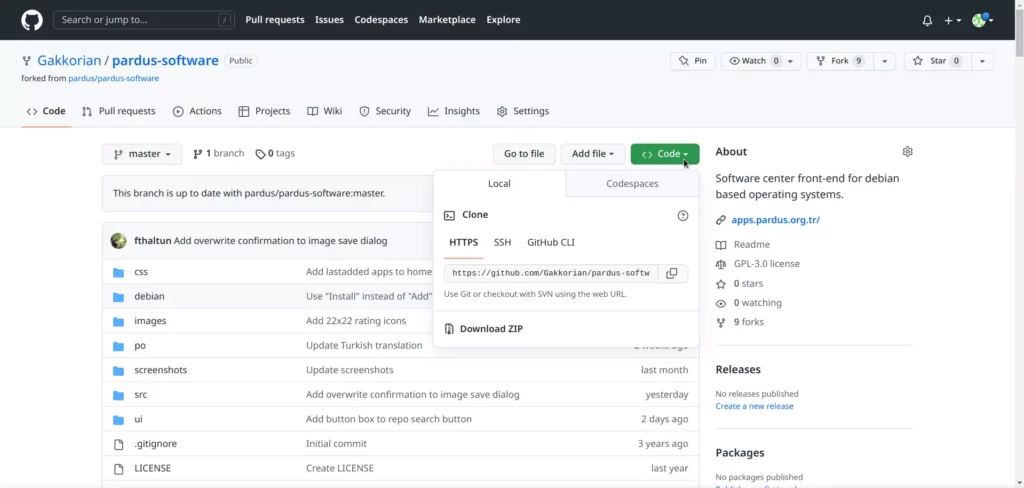
Forklama işlemi bittikten sonra forklanan projeyi bilgisayarımıza indiriyoruz. Bunun için öncelikle forkladığımız projenin code butonuna tıklıyoruz. Ardından dosyayı indiriyoruz.
Çeviri için kullanılacak dosyalara ulaştık. Şimdi çeviri için işimizi kolaylaştıracak araçlara ve web sitelerine bakalım.
Çeviri İçin Hangi Araçlar Kullanılır ?
Tercüme yaparken işimizi kolaylaştıracak bazı araçlar ve web siteleri mevcut. Bunlar;
- Tureng –> Birden fazla dile sahip detaylı bir online sözlük.
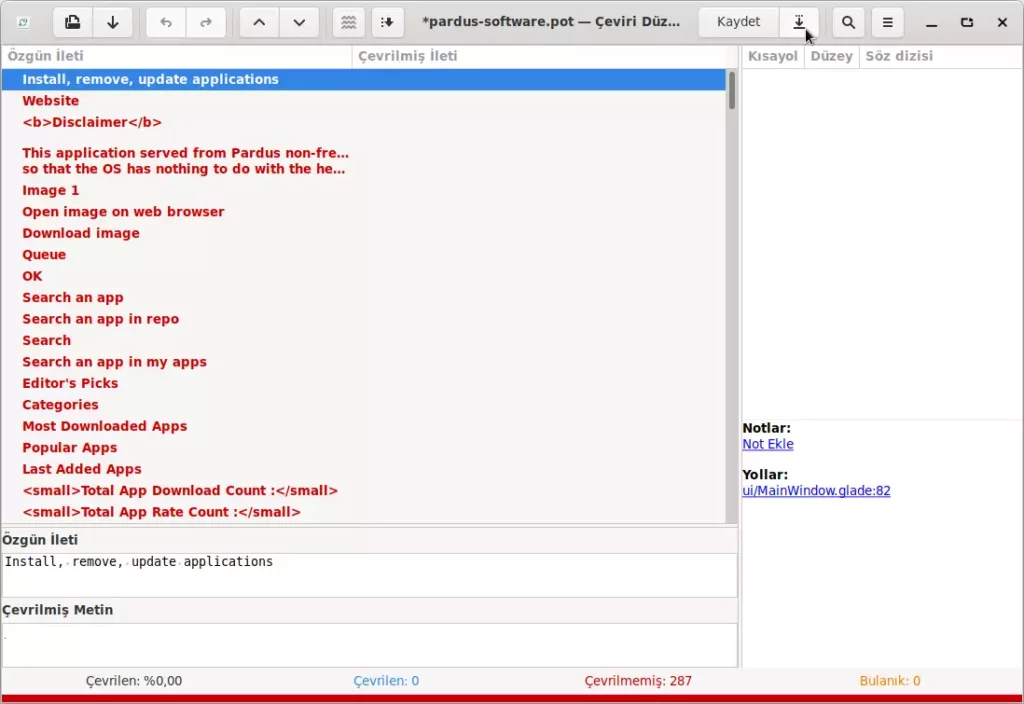
- Çeviri Düzenleyici –> Anlaşılır bir kullanıcı arayüzüne sahip çeviri editörü.
Çeviri editörünü Pardus yüklü bilgisayarınıza Pardus Yazılım Merkezi üzerinden yükleyebilirsiniz. Şimdi Çeviri Editörü programını tanıyalım.
Çeviri Editörün de Profil Ayarlama
Çeviri Düzenleyici ilk yüklediğinizde sizden bir profil oluşturmanızı isteyecektir.
Profil sekmesinde ki gerekli boşlukları doldurunuz.
Ardından dil ayarlarını yapınız. İlgili dili seçtiğinizde altındaki ayarlar otomatik olarak gelicektir isterseniz ayarları elle düzenleyebilirsiniz.
Onay ekranında yaptığınız ayarları görebilirsiniz. Değiştirmek istediğiniz bir ayar varsa ilgili sekmeye gidip değiştirebilirsiniz veya kurulumu tamamladıktan sonra uygulama içerisinden profil üzerinde değişiklikler yapabilir veya farklı diller için yeni profiller ekleyebilirsiniz.
Farklı Diller İçin Yeni Profil Oluşturma
Burada farklı diller için yeni profiller oluşturmayı göstereceğiz. Eğer birden fazla profil oluşturmak istemiyorsanız şuradan yazımıza devam edebilirsiniz.
Öncelikle
Profil ayarlarını tamamladıktan sonra ugulama üzerinden bilgisayarımıza indirdiğimiz pardus-software projesindeki pot dosyasını yükleyeceğiz. (pot dosyaları genellikle ilgili projenin po klasörü içerisinde bulunur)
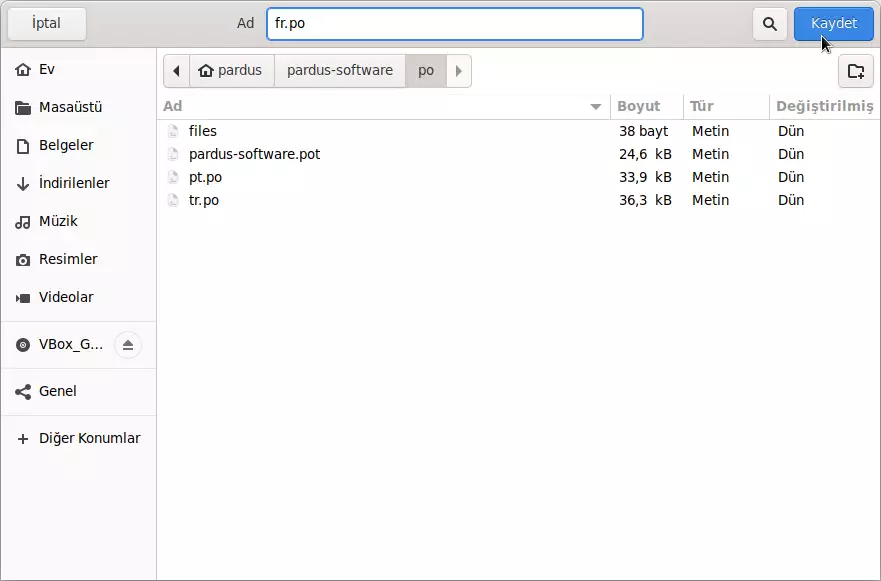
Çeviri düzenleyici uygulamasında Aç butonuna tıklayın ve indirdiğiniz projenin po dizinine gidiniz. Biz örneğimizde pardus-software/po dizinine gidiyoruz.
Burada eğer projede çevirmek istediğiniz dilde eksiklikler(fuzzy) var ve çevirisini yapmak istiyorsanız ilgili dilin po dosyasını açınız. Eğer çevirmek istediğiniz dilin po dosyası yoksa projenin pot dosyasını açınız. Pot dosyasını açmak için Aç kısmında dosya türünü “Gettext çevirisi”nden “Gettext çeviri şablonu”na değiştirin ve pot dosyasını açınız.
Pot dosyası üzerinde herhangi bir değişiklik yapmadan önce ayarlar kısmından (üst üste üç yatay çizginin olduğu buton) “Başlığı Düzenle” seçeneğine tıklayınız.
Karşımıza çıkan pencerede “Proje” sekmesine geçiyoruz. Burada “Proje Id Sürümü” alanına ilgili projenin adını yazıp pencereyi kapatıyoruz.
Son olarak “Farklı Kaydet“(Kaydet butonun sağındaki aşağı yönde ok işareti olan buton) butonuna tıklıyoruz.
Hangi dilde çeviri yapacaksak onun dil kodu – örneğin Türkçe için “tr.po“, Almanca için “de.po“, Fransızca için “fr.po” şeklinde – ile kaydediyoruz.
Artık çeviri dosyanız hazır ve çeviri işlemine başlayabilirsiniz. Çeviri işlemini bitirdiğinizde kaydedip programı kapatabilirsiniz.

Çeviri işleminiz bittikten sonra geriye bir tek çeviri dosyasını/dosyalarını Github daki projemize ekleyip Pull Request atmamız kaldı.
Çeviri Dosyasını Nasıl GitHub’a Yüklerim ?
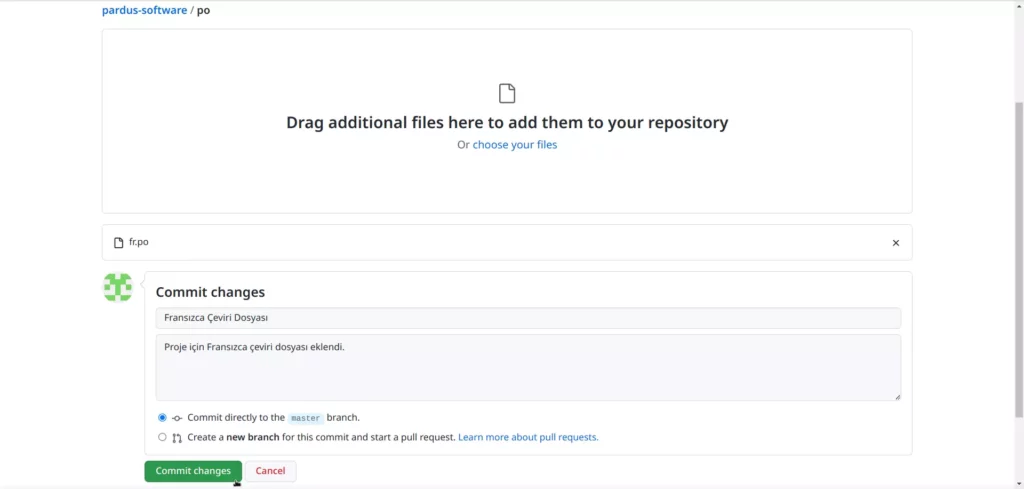
Çeviri dosyasını hazırladıktan sonra GitHub üzerinden bu dosyaları projeye ekleyip Pull Request atacağız.
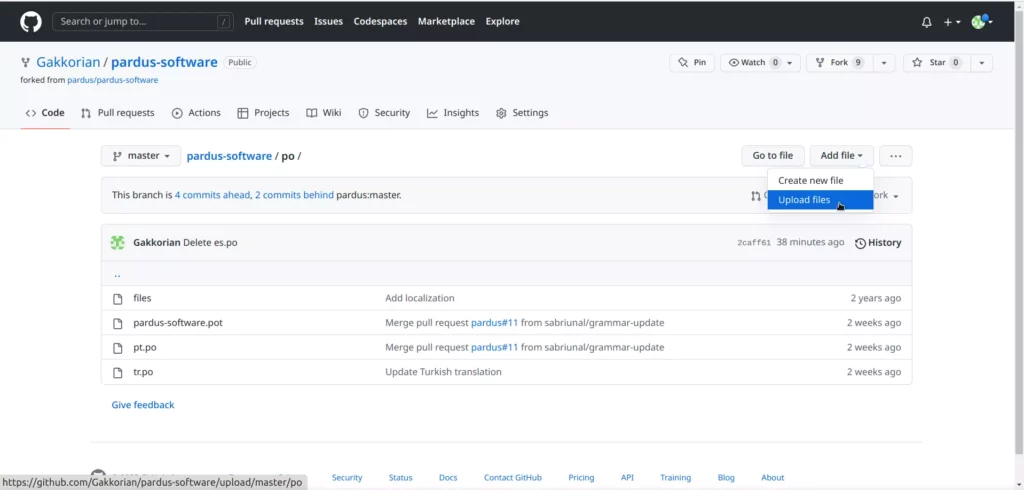
Öncelikle Github da projemizde değişiklik yapacağımız klasöre gidiyoruz. Bizim için bu klasör po klasörüdür.
Dosyayı yükledikten sonra gerekli açıklamayı kısa bir şekilde yazıp gönderiyoruz.
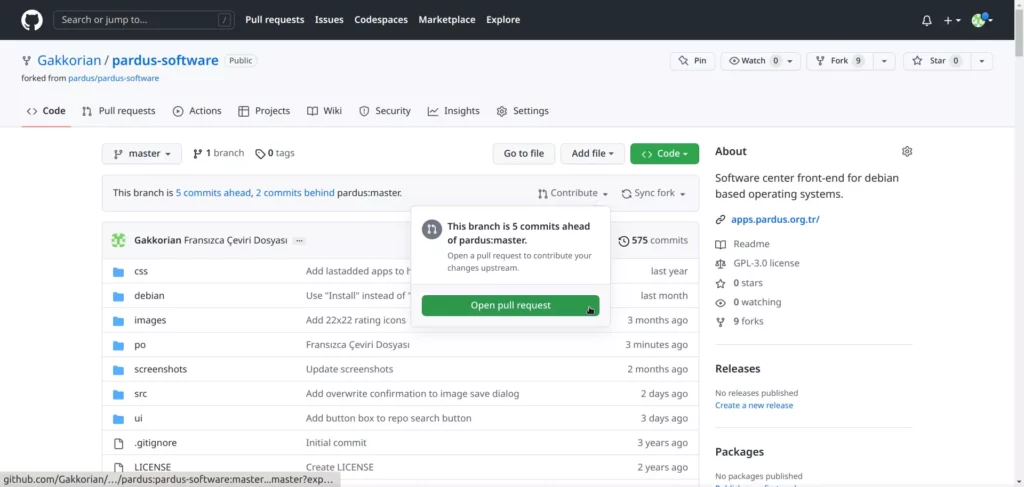
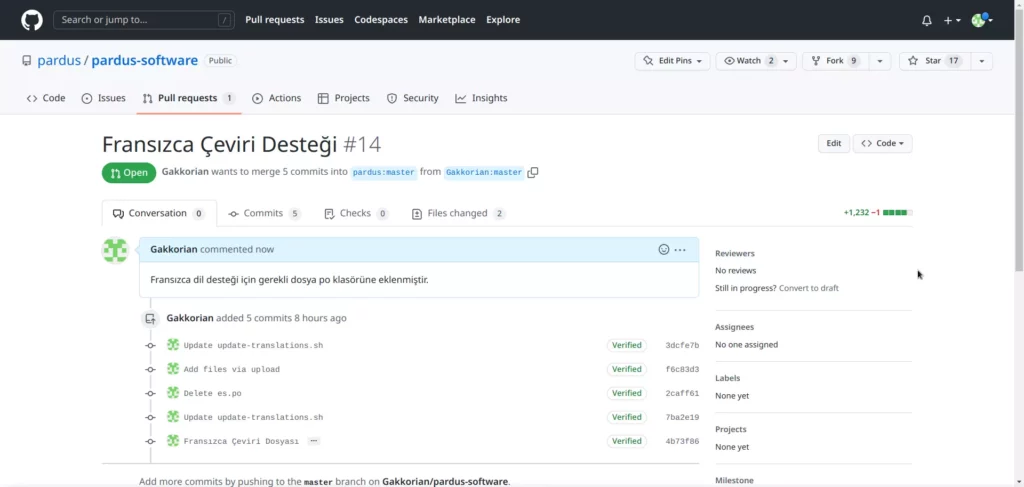
Son olarak yaptığımız bütün bu değişiklikleri proje sahibine bildirmek ve bu değişikliklerin projeye eklenmesi için pull request atıyoruz. Bunun için projemizin ana sayfasına gidiyoruz ve “Contribute” butonuna tıklayıp karşımıza çıkan pencerede “Open Pull Request” butonuna tıklıyoruz.
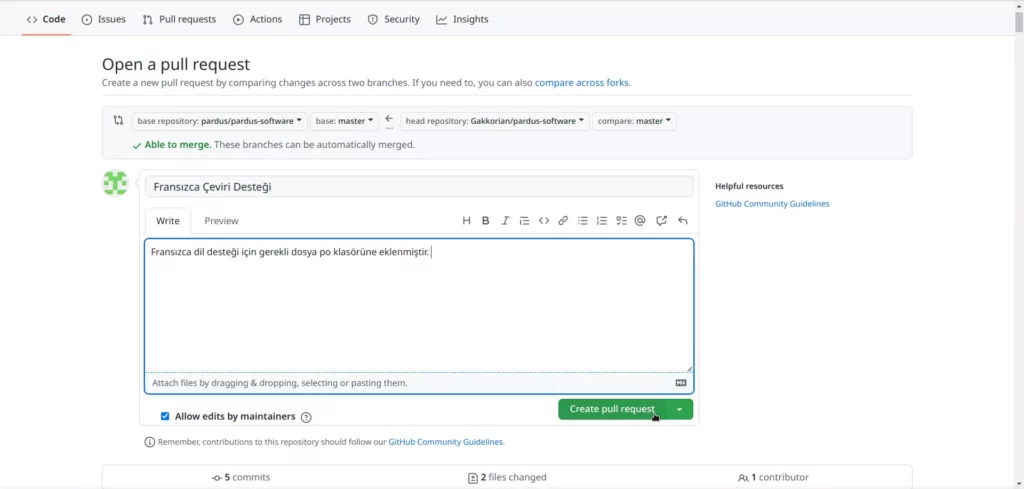
Burada projede yaptığımız bütün değişklikleri detaylı bir şekilde anlatıp “Create pull request” butonuna tıklıyoruz.
Son olarak yaptığımız değişiklikler proje sahibi ve diğer katılımcılar tarafından incelenir doğru ve uygunsa projeye dahil edilir.
Çeviri desteği ile ilgili yazımız burada sona ermekte aşağıdaki bağlantılarda konuyla ilgili detaylı bilgileri bulabilirsiniz. Konuyla ilgili sorularınızı Discord kanalımız üzerinden iletebilirsiniz.
İlgili bağlantılar:
- Pardusa Nasıl Katkı Sağlarım ?
- Git’e Giriş: Temel Git Kullanımı
- Git’e Giriş: GitHub GitLab Kullanımı
- Discord kanalı bağlantımız.

Benzer Yazılar
İlginizi Çekebilir
ETAP’ta Pencereleri Yönetmenin En İyi Yolu: gTile ile Verimliliğinizi Artırın!
Uygulama Tanıtım
19 Şub '25Pardus Güncel Nvidia Sürücü Kurulumu
Nasıl?
26 Ara '24Bir git tabanlı projede yazma iznine sahip olmak isteyen Hackerlar(Yazılımcılar) için Kılavuz
Nasıl?
15 Şub '24Az bilinen nano özellikleri
Nasıl?
9 Şub '24